Crispy Roasted Pork Belly- "THỊT HEO QUAY" Air Fryer Recipe Method


Watch my Instagram cooking -reel here- for my Air fryer Crispy Roasted Pork Belly recipe!
Vietnamese Crispy Roasted Pork Belly: A Family Favorite with a Special Twist
Crispy roasted pork belly, or thịt heo quay, is one of the most beloved and popular dishes in Vietnamese cuisine. This mouthwatering delight is known for its perfectly crisp, bubbly skin and tender, juicy meat. It has become a staple not just in traditional Vietnamese meals but also in street food, especially as a filling in Bánh mì sandwiches. The texture of the crispy pork skin, combined with the succulent layers of fat and meat, makes it a true showstopper.
It’s no wonder that this dish is often found in celebrations and family gatherings, as well as on the streets of Vietnam, where it's sold by vendors as part of savory street banh mì.
For my dad, this dish was his pride and joy. He took immense pleasure in making crispy roasted pork belly for the family, though it wasn’t without its challenges. This dish is notoriously tricky to execute—one small misstep, and the skin could end up chewy instead of crispy, or the fat might not render properly. My dad experimented with numerous techniques, from trying different oils, to adjusting drying methods, and even brushing vinegar or citrus oils on the skin in an attempt to get that ideal crunch.
I still have vivid memories of him sitting in front of the oven, watching the pork belly roast with a kind of nervous intensity. He'd hover by the oven light like a hawk, anxious to see if his latest method would result in that perfect crackling skin. Though 8 or 9 times out of 10, it turned out just the way he wanted, the process always kept him on edge.
The Ultimate Bite: What Makes This Dish Special
So what makes crispy roasted pork belly so special? It’s all about the experience of that first bite. The goal is to achieve a crackling, super crunchy skin on top of a juicy, tender slab of pork belly. It’s that contrast in texture that makes the dish so memorable. Biting into the bubbly skin gives way to the rich, fatty, and tender meat underneath, delivering a burst of flavor and texture that’s hard to match.
Growing up, this dish was a family favorite, and my sisters and I would often fight over the best pieces—the ones with the crispiest skin. We’d jab our chopsticks into the spinning dish, searching for the perfect piece of pork belly, ignoring the ones with chewy or less crispy skin. My dad would guide us, telling us, “No, not that one! Here, this piece is better,” and he’d place a prized, crunchy piece into our bowls. In typical Vietnamese fashion, my parents always made sure we got the best pieces, while they took the less desirable cuts for themselves. As kids, we expected it, but looking back now as an adult, I see how much love was in those gestures.
For me, the best part of the pork belly was always the layer of fat underneath the skin along with the skin. Despite my parents advising me to cut some of it off, I’d happily devour the fatty layers first before moving on to the leaner meat, dipping it in some Maggi sauce for extra flavor.
My Dad’s Special Marinade and Cooking Method
What really sets this crispy pork belly apart is my dad’s special marinade. After trying so many techniques, he finally landed on a marinade that infuses the pork with deep, savory flavors while also helping to achieve that perfect crispy skin. His method involved marinating the pork overnight and then using a combination of vinegar and a refrigerator drying technique to ensure the skin becomes as crispy as possible.
In contrast to my dad, who would spend hours in front of the oven, I’ve adapted his method for a quicker, more convenient approach by using the air fryer. By cutting the pork belly into smaller sections, I can cook them to perfection in a fraction of the time, without sacrificing flavor or texture.
__
I used the air fryer method since because it took only 30 min and turned out super crispy, but I also included an oven recipe. This method doesn’t require a salt crust like my other air fryer recipe.
For traditional baking instructions (not in the air fryer), click below link!
CRISPY SKIN TIPS
Seasoning & Marinating: When marinating your pork belly make sure your marinade does not touch the skin. The skin needs to be absolutely dry to achieve a crispy skin.
Prepping skin: The key step to crispy skin is making small punctures/holes into the pork belly skin that breaks through pork skin's surface but not too deep into the fat layer (if you do fat will come up through the pores). I tried 2 different methods: I used paring knife to puncture and score, and a small sewing needle to puncture skin. The best was just using a needle and puncturing like hundreds of holes into the skin, each hole essentially would blister up during the roasting process.
Slicing: As much as you are craving to cut into the pork belly after it comes out of your oven, resist the temptation and wait til it gets to room temperature or else you'll let all the juices out and you'll also get a soggy pork belly skin!
Vinegar: Vinegar makes the skin super dry and crispy! Nom Nom Nom!
PORK BELLY MEAT MARINADE
3 lbs pork belly (ask butcher for one with a decent amount of meat and nice layer of pork belly skin, I try to find pieces that have at least 1 1/2” of meat)
1 tbs Rum Liqour
1 tbs hoison sauce
2 tbs of Maggi Seasoning
1/2 tsp Chinese bbq powder (adds a little red color)
1 tsp honey
1/2 tbs black pepper
1.5 tsp salt
3/4 tsp 5-spice chinese powder
PREPARATION
1. Clean pork belly step 1: Mix 2 tbs vinegar, 1.5 tsp salt and 4 cups and cover pork in baking pan for 10 min. Place pork skin facing up in the vinegar solution, if the vinegar solution does not cover the skin, you’ll need to do 10 min in the vinegar solution with meat side submerged, then another 10 min with skin side submerged.2. Clean pork belly step 2: Wash and clean pork under water and scrape the skin with sharp knife along the pork belly skin to remove any dirt and dead outer layer/skin from pork belly (Skin should be a clean white throughout entire skin, no dirty patches, this sounds gross but if your pork belly is hairy you’ll need to use a razor to shave off the hairs).
3. Pat dry and let dry for 10 min
4. Cut long slices about 2” apart to the bottom of pork belly vertically along the longest part of your slab of meat (meat part only up to the fat, do NOT cut into fat/skin).
5. If you are using a bucket style air fryer you'll need to cut your pork belly into sections that will fit in your deep fryer, my pieces were about 4” x 6 1/2” sections.
6. Marinate bottom of pork belly (Do not marinate the skin!) and onto the sides of the meat and be careful not to touch the marinade onto the pork belly skin, if you do, just wipe it off with a paper towel. Be sure to get the marinade up into all the cut slits you made as well.
7. Transfer pork belly (skin side up) onto a foil lined pyrex pan that is almost the same size as the pork belly.
8. Score the pork belly skin by poking small holes into the skin with a small pairing knife (or use a needle or sharp tenderizer) and make sure you break into the skin but not too deep into the fat layer.
9. Pat dry the skin with a paper towel and brush the skin of the pork belly with vinegar. Wait till it completely dries.
*Extra step: If you’re not in a hurry to make/eat this dish and can prep this overnight, after the above vinegar step above, you can lightly salt with skin and rub the salt evenly across the top of the skin (about 1/2 to full tsp of salt). Let dry for 24 hours uncovered in the fridge, this helps dry the skin out and guarantees a more crispy skin but the last dozen times I made this I was able to skip this step.
AIR FRYER DIRECTIONS
1. Sprinkle a nice layer of sea salt or kosher salt on top generously so you have nice salt crust layer on top of the pork belly skin. You want a nice layer of salt, pack down on it so you have a nice salt crust, don’t worry you’ll remove this salt layer off later and it won’t make the pork taste salty.
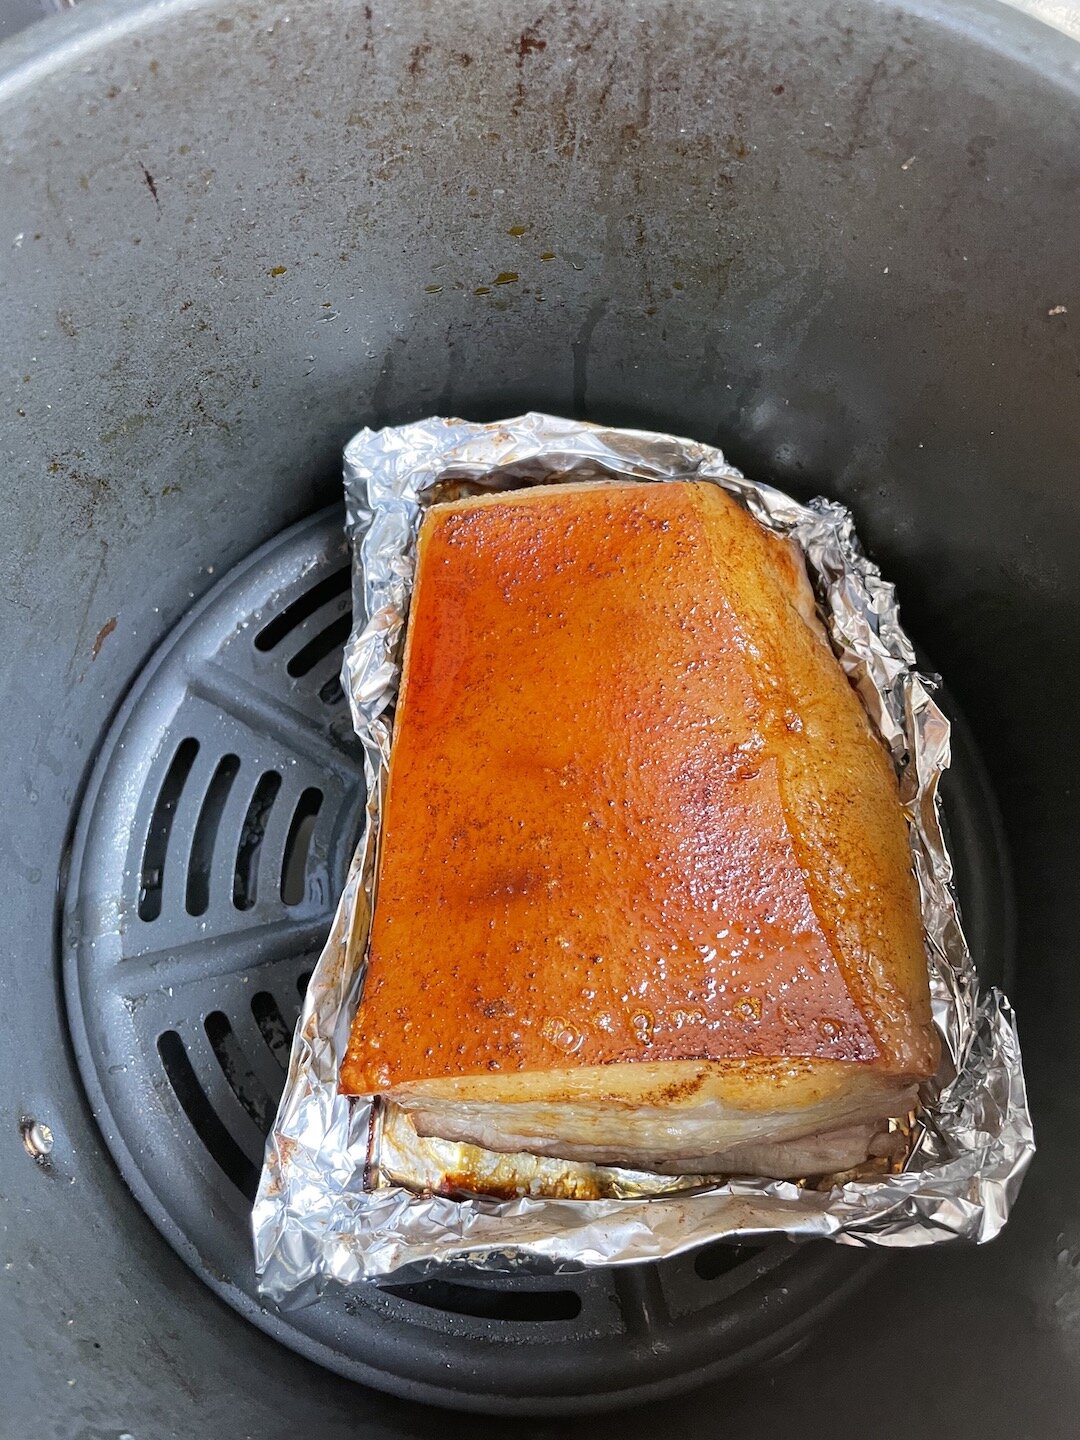
2. Place foil wrapped pork belly and place into air fryer for 20 min at 300 degrees on “air fry” mode. Wipe off salt layer. Brush pork belly skin with sesame oil. Then air fry again for about 5-10 minutes at 400-450F until skin is crispy and bubbly (careful not to let skin burn, mine took about 6 min at 450F for that perfect crisp but it depends on how big your pork belly slab is). Meat is done at 145F in the thickest part of the pork meat.
FINISHING
1. Remove from oven/air fryer and place on wire rack and let cool for 15 minutes.
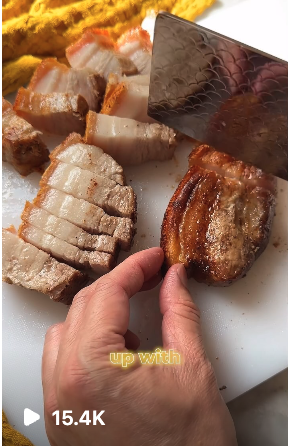
2. Cut along bottom cut lines that you made with skin side down.
3. Then cut each slice into many 1/2” slices by slowing cutting down on the meat and through the skin, and then press firmly down to snap/cut through the skin.
SERVING
1. Serve with fish dipping sauce, Nuoc Mam or Nuoc Mam Gung
2. Plate with fine rice noodles fresh lettuce and herbs
After 10 min in air fryer at 300 degrees this is what it looked like.

After another 10 min in air fryer at 375 degrees it looked perfect like this!

Make sure your pork belly meat is at least 145, this was after like 8 min so I put it back in for a couple more minutes till it reached 145.